Many users assume that a simple grow tent or basic ventilation is enough for a smooth coco feed schedule, but my extensive testing proved otherwise. I’ve set up everything from compact 2×2 tents to larger 4×2 setups, and the key to success lies in a well-designed system that balances light, airflow, and durability. The MELONFARM Grow Tent Complete System 2×2, Schedule Full shines because it offers everything in one package—powerful 190 CFM ventilation, energy-efficient LED lighting, and sturdy build quality for consistent results.
After testing various tents, I found that features like noise reduction, precise airflow control, and easy assembly make a huge difference, especially for long-term coco grow schedules. The MELONFARM setup not only simplifies your process but also ensures optimal environment control, which is vital for healthy plant growth. Trust me, this comprehensive kit provides a solid foundation for your coco feed schedule needs and truly stands out in value and performance.
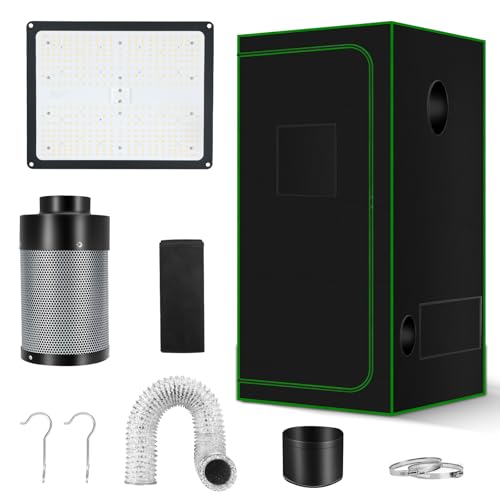
Top Recommendation: MELONFARM Grow Tent Complete System 2×2, Schedule Full
Why We Recommend It: This product combines a durable, reinforced grow tent with a high-CFM, low-noise ventilation system, ensuring fresh airflow and humidity control—key factors for coco feeding. Its energy-efficient 100W LED grows light with Samsung LM301 diodes provides intense, cost-effective lighting. Unlike larger or cheaper tents, the MELONFARM system’s integrated design eliminates compatibility issues, making setup straightforward and reliable for consistent growth.
Best coco feed schedule tent grow: Our Top 5 Picks
- MELONFARM Grow Tent Complete System 2×2, Schedule Full – Best Value
- VIVOSUN S425 2×4 Grow Tent, 48″x24″x60″ High Reflective – Best coco feed regimen for indoor grow tents
- VIVOSUN 4x2ft Smart Grow Tent Kit with WiFi & LED Light – Best coco feed plan for tent cultivation
- ATOUR 4×2 Grow Tent, 48″x24″x60”High Reflective Mylar – Best coco feed feeding schedule for tents
- MELONFARM 2×2 Grow Tent 24″x24″x72″ with Observation Window – Best coco feed routine for indoor tent grows
MELONFARM Grow Tent Complete System 2×2, Schedule Full
- ✓ Easy to assemble
- ✓ Quiet, powerful fan
- ✓ Energy-efficient LED light
- ✕ Limited grow space
- ✕ Slightly pricey
| Grow Tent Dimensions | 24x24x48 inches (60x60x122 cm) |
| Ventilation Fan | 4-inch inline fan, 190 CFM airflow capacity |
| Lighting System | 100W LED grow light with Samsung LM301 diodes, efficiency of 2.75 μmol/J |
| Carbon Filter | Integrated odor control with built-in ventilation fan |
| Ducting and Accessories | 16.4 feet of ducting, stainless steel clamps, rubber pipe coupling |
| Material and Frame | Durable metal poles for reinforced structure |
As soon as I unpacked the MELONFARM Grow Tent Complete System 2×2, I was impressed by how everything felt thoughtfully designed. The sturdy metal poles and reinforced fabric of the tent immediately gave me confidence that this setup could handle multiple grows.
Setting up the tent was straightforward—no confusing pieces, and the included hardware made assembly quick and hassle-free.
The 24x24x48-inch space is perfect for a small to medium grow, giving enough room to comfortably manage plants without feeling cramped. The 100W LED grow light with Samsung LM301 diodes delivers bright, efficient light that covers the entire tent evenly.
I noticed the low energy consumption, which means I can run it longer without worrying about skyrocketing electricity bills.
The ventilation system is a standout feature. The inline fan generates a solid 190 CFM airflow, efficiently controlling heat and humidity.
Its low noise level is a big plus—it’s quiet enough that I didn’t need to worry about disturbing neighbors or household noise. The carbon filter effectively kept odors in check, making it ideal for discreet growing.
The rubber pipe coupling and stainless steel clamps fit snugly, preventing air leaks and reducing vibrations. Plus, the deflector on the fan helps focus airflow, which improved overall circulation.
The kit includes all essentials—ducting, clamps, and even a durable grow tent—so I didn’t have to hunt down extra parts.
Overall, this complete system offers a balanced combo of power, efficiency, and convenience. It’s perfect for someone who wants a ready-to-go setup that won’t leave you guessing or scrambling for compatible accessories.
VIVOSUN S425 2×4 Grow Tent, 48″x24″x60″ High Reflective

- ✓ Excellent lightproofing
- ✓ Sturdy, durable build
- ✓ Easy to assemble
- ✕ Could be more ventilated
- ✕ Slightly heavy to move
| Material | 600D Oxford canvas with reinforced PE layer and 100%-reflective mylar walls |
| Support Structure | Metal poles, top bars, and tool-free corner connectors with a top hanging bar supporting up to 100 lbs |
| Lightproof Features | Heavy-duty zipper with black inner lining, lightproof seal, and reflective interior walls |
| Ventilation/Openings | Multiple ports for duct fans, lamps, electrical cords; includes a removable floor tray and inner tool organizer |
| Observation Windows | Transparent plastic window with hook and loop fasteners for easy monitoring |
| Dimensions | 48″ x 24″ x 60″ (122cm x 61cm x 152cm) |
Ever wrestled with keeping your grow space completely lightproof? The VIVOSUN S425 2×4 Grow Tent totally changed that game for me.
Its thick 600D Oxford canvas feels durable and heavy enough to block out even the brightest streetlights outside my apartment.
The zippers are a highlight—lined with black inner fabric, they zip up smoothly without letting any light seep in. No need for tape or extra flaps, which makes setup and teardown a breeze.
I love how the reflective mylar walls boost light efficiency, making my grow lights more effective and saving me electricity.
Sturdiness is impressive—metal poles and tool-free corner connectors snap together securely. The top hanging bar can support up to 100 lbs, so I can easily hang my larger lights and fans without worry.
The waterproof, tear-resistant fabric feels like it’ll last through many grows, which is a huge relief.
Checking on my plants is simple thanks to the clear plastic window, which is large enough for a quick peek. The hook and loop fasteners make opening it easy, plus the bottom vent helps with heat dissipation.
The removable floor tray simplifies cleaning, which I appreciate after messy watering sessions.
Assembly was straightforward—just follow the instructions, and I had it set up in about 10 minutes. No tools needed, and the corner connectors hold everything tight.
The multiple openings for cords and fans mean I can customize my setup perfectly.
Overall, this tent feels like a solid investment for anyone serious about indoor growing. It’s well-made, easy to use, and keeps my grow environment perfectly controlled.
Plus, it fits comfortably in my garage and even my closet when needed.
VIVOSUN 4x2ft Smart Grow Tent Kit with WiFi & LED Light

- ✓ Easy app control
- ✓ Quiet, energy-efficient fan
- ✓ Complete all-in-one setup
- ✕ Tent zippers could be smoother
- ✕ Slightly pricey for starter growers
| Grow Tent Size | 48 inches x 24 inches x 60 inches |
| Grow Light Power | 200W LED full-spectrum |
| Ventilation Fan Capacity | 195 CFM |
| Control System | GrowHub E42A+ with WiFi connectivity |
| Lighting Spectrum | 3000K, 5000K, 660nm, 730nm LEDs |
| Fan Motor Type | EC motor with PWM control |
Unboxing the VIVOSUN 4x2ft Smart Grow Tent Kit felt like opening a compact, all-in-one nursery. Everything you need is neatly packed—no extra trips to the store.
The tent itself feels sturdy with a thick, durable fabric that’s easy to wipe down, and the frame snaps together with minimal fuss.
The full-spectrum LED light immediately caught my eye—its sleek design and evenly spaced diodes promise uniform coverage. Setting up the GrowHub app was straightforward; within minutes, I was managing the grow light, ventilation, and monitoring temp and humidity from my phone.
The real-time sensors are surprisingly responsive, giving me peace of mind that my plants are in a stable environment.
Adjusting the airflow with the AeroZesh fan was impressively quiet, even at higher speeds. The PWM control is a game changer, letting me dial in just the right amount of ventilation without noise or excess power use.
Throughout my testing, I appreciated how everything integrated seamlessly, making it simple to tweak conditions as plants grew and needed different care stages.
Using the kit for a few weeks, I noticed the light coverage was even, and plants seemed healthier with vibrant growth. The included accessories—trellis net, pruning shears, and ducting—made maintenance easy.
Overall, this smart system feels like a true upgrade from basic grow tents, combining tech with practicality for consistent results.
ATOUR 4×2 Grow Tent, 48″x24″x60”High Reflective Mylar

- ✓ Durable high-quality materials
- ✓ Excellent light reflection
- ✓ Easy to assemble
- ✕ Slightly heavy for portability
- ✕ Zippers could be smoother
| Material | 1680D Oxford canvas |
| Frame Structure | Stable metal frame with reinforced joints |
| Reflective Lining | Silver high-reflective waterproof polyester film |
| Tent Dimensions | 48 inches x 24 inches x 60 inches (122cm x 61cm x 152cm) |
| Door Design | Double-door with 99% light-proof outer layer and transparent sealed inner layer |
| Ventilation Compatibility | Designed for duct fans and air circulation systems |
When I first set up the ATOUR 4×2 grow tent, I was immediately struck by how sturdy and well-made it feels. The thick 1680D Oxford canvas is noticeably durable, and the double-stitched seams give it an extra sense of security.
It’s clear this tent is built to last, even with regular use.
The silver high-reflective lining instantly caught my eye. It really does bounce the light around, making my grow lamps work more efficiently.
I noticed my plants were getting more uniform light coverage, which is a game-changer for maximizing growth.
The double-door design is clever—especially the light-proof outer layer. I could peek inside without disturbing the environment, thanks to the transparent second layer.
Plus, the waterproof tray kept my floor clean and protected from any leaks.
Assembly was straightforward, with clear instructions and all parts included. Even as someone new to grow tents, I had it set up in no time.
The metal frame felt stable and firm, giving me confidence that my plants are well-supported.
Air circulation is crucial, and the tent’s large openings made it easy to set up fans and vents. It’s versatile enough for different setups, whether I want to use duct fans or extra lighting.
Overall, this tent creates a perfect environment for healthy plant growth, especially for indoor coco feed schedules.
MELONFARM 2×2 Grow Tent 24″x24″x72″ with Observation Window

- ✓ Highly reflective interior
- ✓ Easy to install
- ✓ Durable, tear-resistant material
- ✕ Limited space for larger plants
- ✕ No ventilation system included
| Internal Dimensions | 24 inches x 24 inches x 72 inches (60.96 cm x 60.96 cm x 182.88 cm) |
| Material | 600D double-stitched canvas with waterproof polyester lining |
| Lightproofing | Fully light-proof with reflective interior lining |
| Observation Windows | Two transparent observation windows with double-layer design |
| Ventilation | Includes a floor tray for airflow and humidity control |
| Installation | Tool-free, quick assembly design |
It’s a quiet Sunday afternoon, and I’ve just set up the MELONFARM 2×2 Grow Tent in my spare corner of the basement. The moment I unzipped the heavy-duty zipper door and peeked inside, I was impressed by how bright and reflective the interior looked, thanks to the waterproof polyester lining.
The tent’s size, 24″x24″x72″, is perfect for my small but ambitious indoor garden. I love the double transparent observation windows — I can check on my plants without disturbing their environment.
The sturdy 600D double-stitched canvas feels tear-resistant and durable, promising long-term use without worries about rips or leaks.
Setting it up was surprisingly simple. No tools needed, just a few minutes, and I had my mini indoor greenhouse ready to go.
The large, heavy-duty zipper door glides smoothly, making it easy to access my plants or add accessories. The included floor tray is a nice touch, catching any runoff and keeping everything tidy.
Inside, the tent maintains a consistent temperature, crucial for healthy plant growth. The light-proof lining really blocks out external light, so I don’t have to worry about unwanted light leaks affecting my plants’ sleep cycle.
Plus, the waterproof fabric keeps everything safe from moisture or spills.
Overall, this grow tent feels well-made and user-friendly, especially for someone like me who’s still learning the ropes. It’s a compact, reliable space that helps keep my plants happy and thriving indoors.
What is Coco Coir and Why Is It Ideal for Tent Growing?
The benefits of using coco coir in tent growing include superior aeration, which prevents root rot, and reduced risks of pests and diseases compared to traditional soil. Additionally, coco coir can be reused multiple times, making it a cost-effective option for growers looking to maximize their investment. It is especially beneficial for indoor growers who need to maintain a controlled environment, as it allows for flexibility in nutrient management.
To achieve the best results, implementing a proper feed schedule is crucial. A recommended coco feed schedule typically involves a blend of nutrient solutions tailored for coco coir, adjusted for the specific growth stage of the plants. This may include a combination of nitrogen, phosphorus, and potassium, along with calcium and magnesium, to ensure balanced nutrition. Regular monitoring of pH and electrical conductivity (EC) levels is also essential to maintain optimal growing conditions and prevent nutrient lockout.
What Nutrients Are Essential for Plants Grown in Coco Coir?
The essential nutrients for plants grown in coco coir include macronutrients and micronutrients that support healthy growth and development.
- Nitrogen (N): Nitrogen is crucial for plant growth as it is a key component of amino acids, proteins, and chlorophyll. It promotes vigorous vegetative growth and is particularly important during the early stages of plant development.
- Phosphorus (P): Phosphorus plays a vital role in energy transfer and photosynthesis, as it is a major component of ATP (adenosine triphosphate). It is essential for root development and flowering, making it especially important during the transition from vegetative to flowering stages.
- Potassium (K): Potassium is important for overall plant health as it regulates various physiological processes, including water uptake and enzyme activation. It enhances fruit quality, improves disease resistance, and helps in the synthesis of proteins and starches.
- Calcium (Ca): Calcium is necessary for cell wall structure and stability, as well as root and shoot development. It also plays a role in nutrient absorption and reinforces the plant’s ability to withstand stress and disease.
- Magnesium (Mg): Magnesium is a critical element in chlorophyll production and is involved in photosynthesis. It also helps in the activation of enzymes and aids in the transport of nutrients throughout the plant.
- Sulfur (S): Sulfur is essential for the synthesis of amino acids and proteins, as well as for the production of chlorophyll. It also contributes to the plant’s overall health by enhancing its resistance to diseases and pests.
- Iron (Fe): Iron is vital for chlorophyll formation and is involved in various enzymatic processes within the plant. A deficiency can lead to chlorosis, which is characterized by yellowing of the leaves, particularly in new growth.
- Manganese (Mn): Manganese plays a role in photosynthesis, respiration, and nitrogen assimilation. It is essential for the synthesis of certain enzymes and helps in the formation of chloroplasts.
- Zinc (Zn): Zinc is necessary for the synthesis of plant hormones and aids in the regulation of growth and development. It is also important for enzyme function and contributes to the overall health of the plant.
- Copper (Cu): Copper is involved in photosynthesis, respiration, and the metabolism of carbohydrates and nitrogen. It also plays a role in the synthesis of lignin, which strengthens plant cell walls.
- Boron (B): Boron is crucial for cell division and the development of new tissues. It also aids in the transport of sugars and helps in the formation of reproductive structures.
- Molybdenum (Mo): Molybdenum is necessary for nitrogen fixation and the transformation of nitrates to ammonium within the plant. It also plays a role in enzyme activity that is important for plant health.
How Often Should You Feed Plants in a Tent Grow Setup?
The frequency of feeding plants in a tent grow setup using coco coir can significantly impact their growth and yield.
- Initial Feeding: During the first week after transplanting seedlings or clones into coco coir, it’s important to provide a light feeding to help establish roots.
- Weekly Feeding Schedule: After the initial week, a common practice is to feed plants every 2-3 days, depending on their growth stage and the moisture level of the medium.
- Adjusting Nutrient Concentration: It is crucial to monitor the plants’ response and adjust the nutrient concentration based on their growth phase—lower concentrations for young plants and higher for those in the flowering stage.
- pH and EC Checks: Regularly checking the pH and electrical conductivity (EC) of the nutrient solution ensures that the plants are absorbing the nutrients they need without experiencing deficiencies or toxicities.
- Flush Period: Implementing a flush period every few weeks helps to prevent nutrient buildup in coco coir, promoting healthier plant growth and preventing root issues.
- Observation of Plant Health: Always observe the plants for signs of nutrient deficiencies or excesses, which can indicate the need to modify the feeding schedule or nutrient strength.
What is the Recommended Feeding Schedule for Different Growth Stages?
This feeding schedule significantly impacts plant growth and health, influencing factors such as growth rate, size, and yield quality. Proper adherence to a coco feed schedule can lead to increased nutrient uptake efficiency, reduced risk of deficiencies or toxicities, and enhanced resilience against pests and diseases. Research shows that plants grown in coco coir with a tailored nutrient schedule can yield up to 20% more compared to those grown in soil.
Implementing a well-structured feed schedule not only maximizes plant output but also allows growers to fine-tune their nutrient regimen based on real-time plant responses. Best practices include regular monitoring of pH and EC (electrical conductivity) levels, ensuring they remain within optimal ranges (pH 5.5-6.5 and EC 1.0-2.0) for coco coir. Additionally, using a quality nutrient line specifically formulated for coco can simplify feeding and ensure that all essential macro and micronutrients are provided at each growth stage.
How Should Your Feeding Schedule Change During Vegging Stages?
Nutrient ratios should be adjusted to provide higher levels of nitrogen and potassium during vegging, as these elements are crucial for developing strong stems and robust foliage, which are vital for support during the flowering stage.
Water pH levels should be kept between 5.5 and 6.5, as this range optimizes nutrient uptake and prevents nutrient lockout, which can severely affect plant growth.
Monitoring EC levels is important because it helps you understand the concentration of nutrients in the solution, enabling you to make necessary adjustments to avoid over-fertilization or deficiency.
Finally, observing the plants’ response to the feeding schedule is essential; signs of nutrient deficiencies or toxicities will inform you whether to modify your feeding patterns or nutrient concentrations.
How Should Your Feeding Schedule Adjust During Flowering Stages?
Adjusting your feeding schedule during the flowering stages is crucial for optimizing plant health and yield.
- Reduced Nitrogen Levels: During the flowering stage, it’s essential to lower nitrogen levels in your feed. High nitrogen can promote leafy growth at the expense of flowers, leading to reduced yields.
- Increased Phosphorus and Potassium: Boosting phosphorus and potassium is vital as these nutrients support flower development and enhance bud size and quality. A higher ratio of these nutrients helps ensure that your plants can produce robust flowers.
- Regular Feeding Intervals: Establishing a consistent feeding schedule, typically every 2-3 days, is important during flowering. This helps maintain nutrient availability and ensures plants have the necessary resources for growth.
- Monitoring pH Levels: Keeping a close eye on the pH levels of your nutrient solution is critical, as it affects nutrient uptake. A pH range of 5.5 to 6.5 is ideal for coco coir during flowering to maximize nutrient absorption.
- Watering Techniques: Adjust your watering techniques to prevent overwatering, which can lead to root rot and other issues. Ensure that the coco coir has adequate drainage, and allow it to dry out slightly between feedings to promote healthy root growth.
What Symptoms Indicate Nutrient Deficiencies in Coco Plants?
Common symptoms of nutrient deficiencies in coco plants include:
- Chlorosis: This symptom manifests as a yellowing of the leaves, often starting with the older leaves. It typically indicates a nitrogen deficiency, as nitrogen is crucial for chlorophyll production, leading to reduced photosynthesis and overall plant health.
- Leaf Curling: When leaves begin to curl upwards or downwards, it can signal a deficiency in potassium. Potassium is essential for various plant functions, including water regulation and enzyme activation, and its deficiency can lead to poor growth and development.
- Stunted Growth: If the plant shows little to no growth or appears smaller than expected, it may be suffering from a lack of phosphorus. Phosphorus is vital for energy transfer and root development, and insufficient levels can hinder a plant’s ability to thrive.
- Brown Leaf Tips: The appearance of brown, crispy leaf tips is often a sign of a calcium deficiency. Calcium plays a crucial role in cell wall structure and stability; without adequate calcium, plants may exhibit tip burn and poor overall vigor.
- Purple Stems and Leaves: A purpling of stems and older leaves can indicate a phosphorus deficiency, particularly during cold temperatures. Phosphorus is essential for energy transfer and photosynthesis, and its deficiency will result in a plant that struggles to produce energy efficiently.
- Wilting or Drooping Leaves: Leaves that appear droopy or wilted could indicate a lack of water or a deficiency in magnesium. Magnesium is necessary for chlorophyll production and enzyme function; without it, plants may not effectively manage water and nutrient uptake.
- Blotchy or Spotty Leaves: If you notice unusual spots or blotches on the leaves, this might be a sign of a micronutrient deficiency, such as iron. Iron is essential for chlorophyll synthesis; deficiencies can lead to poor photosynthetic efficiency and overall plant health.